Showing posts with label Adepticon. Show all posts

Monday, March 20, 2017

Introducing the LEGION OF DOOM!!! Chaos' Answer to Super Friends.


With Adepticon fast approaching, our current resident hope for winning the 40k Championships this year lies with Bill Keys and his Super Friends list. For those of you who are unfamiliar with this army list, it's essentially a combination of Dark Angels, Space Marine Librarius Conclave, and Space Wolf Thunderwolf Characters that combine to create an unkillable/unstoppable unit of frustration and douchebaggery. Seemingly, the only way to win against it is to not play at all.


I was tasked with creating an army that could counter Super Friends in order to give Bill some competitive practice. It would need a shit load of psykers + high strength beat sticks + stupid gear that gives you ridiculous invulnerable saves. Thus was born The Legion of Doom. Using Super Friends as a model, I've combined the best equivalents from the Chaos Space Marine, Daemons, and Khorne Daemonkin into one singular ass-smashing machine. The list:

Cyclopia Cabal Formation (CSM Black Legion)
ENDLESS HATRED: Units that have the Veterans of the Long War special rule have the Hatred special rule, and can re-roll failed To Hit rolls in every round of close combat when attacking units that contain any models from the Armies of the Imperium.

Shroud of Deceit: At the start of each of your Psychic phases, select one model from the Cyclopia Cabal to lead it in a dark ritual. That model can attempt to manifest the Shroud of Deceit psychic power, below. For each other Sorcerer from this Formation that is within 12", add one dice to the Psychic Test – these dice do not cost any Warp Charge points.

SHROUD OF DECEIT......WARP CHARGE 3

Shroud of Deceit is a psychic power that targets a single non-vehicle enemy unit within 30". The target unit cannot be locked in combat. You can immediately make a shooting attack with that unit as though it were part of your army.

HQ
Chaos Biker Sorcerer – 170 Points

  • Force Axe
  • Veterans of the Long War (+1 LD and Hatred Space Marines)
  • Sigil of Corruption +25
  • Level 3 +50
  • Spell Familiar +15 (Reroll failed psychic tests)
  • Bike +20

Chaos Biker Sorcerer – 170 Points

  • Force Axe
  • Veterans of the Long War (+1 LD and Hatred Space Marines)
  • Sigil of Corruption +25
  • Level 3 +50
  • Spell Familiar +15 (Reroll failed psychic tests)
  • Bike +20

Chaos Biker Sorcerer – 170 Points

  • Force Stave
  • Veterans of the Long War (+1 LD and Hatred Space Marines)
  • Sigil of Corruption +25
  • Level 3 +50
  • Spell Familiar +15 (Reroll failed psychic tests)
  • Bike +20

Chaos Jump Pack Sorcerer – 170 Points

  • Force Axe
  • Veterans of the Long War (+1 LD and Hatred Space Marines)
  • Sigil of Corruption +25
  • Level 3 +50
  • Spell Familiar +15 (Reroll failed psychic tests)
  • Jump Pack +15
  • Melta Bomb +5


Daemons of Chaos CAD
HQ
Kairos Fateweaver – 300 Points (Warlord)

  • Mastery Level 4
  • Re-Roll Warp Storm
  • Re-Roll 1 dice per turn
  • CAN ONLY USE 1 HEAD PER TURN
  • Right Head (All of Change, 1 Pyromancy, 1 Divination, and 1 Daemonology)
  • Left Head (All of Change, 1 Telepathy, 1 Biomancy, and 1 Daemonology) 

Herald of Tzeentch – 70 Points

  • Paradox +25 (S user AP4 Melee, Concussive, Warp Contradiction: Once per turn, when taking a Psychic test, the bearer can pick up and turn all of the dice he has rolled to their opposite side instead. For example, if he rolled a 5, 3 and a 1, he could turn them into a 2, 4 and a 6 respectively, thereby harnessing 2 Warp Charge points.) 

Herald of Tzeentch – 100 Points

  • Exalted Reward +30 (Grimoire of True Names)
  • Disc of Tzeentch +25 

Troops
10x Brimstone Horrors – 30 Points

Fast Attack
3x Screamers of Tzeentch – 75 Points


Khorne Daemonkin CAD (Death Star Will Generate Blood Tithe)
HQ

  • Chaos Biker Lord – 160 Points
  • Bike +20
  • Sigil of Corruption +25 (4++)
  • Lightning Claw +15
  • Power Fist +25
  • Mark of Khorne (Rage and Counter Attack) 

Herald of Khorne – 125 Points

  • Furious Charge (+1S on charge)
  • Hatred Slaanesh
  • Hellblade (SU AP3)
  • Juggernaut of Khorne +45
  • Greater Locus of Wrath +25 (Hatred) 

Troops
8x Chaos Cultists of Khorne – 58 Points

  • Mark of Khorne (Rage and Counter Attack) 

8x Chaos Cultists of Khorne – 58 Points

  • Mark of Khorne (Rage and Counter Attack) 

Fast Attack
10x Flesh Hounds of Khorne – 160 Points

  • Collars of Khorne (+2 to deny the witch rolls for the unit)
  • Furious Charge (+1S on charge)
  • Hatred Slaanesh
  • Scout
  • Fearless 


TOTAL – 1846


The idea is to combine the Cabal, Flesh Hounds, Herald Of Khorne, and Lord of Khorne into a single deathstar. The list generates 20 warp charge and 22 powers. By taking summoning on the Paradox Herald I can add to that by guaranteeing a successful summoning of Pink Horrors every turn. Alternatively, should I get the proper power, I can summon Screamers to zoom around and capture objectives. Priority on powers is generally:

Invisibility
Endurance
Sanctuary
Cursed Earth
Iron Arm
Hammerhand
Warp Fate
Misfortune
Enfeeble
Prescience
Summoning Type Powers

The top 3 powers are a must. Anything else just adds to the utility of the main deathstar. Summoning will be taken every game by the Paradox Herald and Fateweaver's heads. Fateweaver is also guaranteed Prescience. At peak performance with ideal powers the deathstar will be rocking a 2++ re-rollable with a 4+ Feel No Pain and Eternal Warrior. The unit is Fearless, can scout, and has Hatred. I feel like the only thing it lacks that Super Friends has, is Hit and Run. Which admittedly, is a big deal, but I feel like it still stands up when you consider that every unit killed by the death star generates Blood Tithe for summoning D-Thirsters. There's also my re-rollable Warp Storm that can have some pretty interesting effects on the game.

We put the army through its paces recently to see how well it held up to 40k's current unbeatable army. Below is a quick summary of the game.

We played Mission 1: Marduck's Teeth from the Adepticon 2017 missions packet.

Legion of Doom deployment.
Super Friends deployment.

The Legion had round one. The Deathstar creeped forward staying out of charge range of the Super Friends. 3 Screamers were summoned and the Deathstar powered up.


The Super Friends moved up and ate a unit of Cultists.


After powering up and and summoning more Screamers, the shit hit the fan in round 2 as the Deathstars finally met each other.


The Legion comes out on top killing one of the Wolf Guard Battle Leaders. The Super Friends then Hit and Ran out of the combat like a bunch of pansies.


The next round saw them charge back in. As you can see the Legion hit them so damn hard that one of the models was knocked off of its base and clean into orbit. Reports are coming in that it can be seen floating outside one of the widows near the international space station. Rallied by their fallen comrade, they killed off a handful of Flesh Hounds in their turn and my ensuing turn. They then Hit and Ran again like a bunch of hookers.


Super Friends then multi assaulted my 2 units of Brimstone Horrors and Heralds which they thoroughly trounced.


The Legion charged back in and the 2 units continued their tickle fight slowly chipping away at each other. My remaining unit of Cultists also entered fray. After pooping on the Cultists, Super Friends attempted to Hit and Run again but failed to roll enough distance to leave the combat.


When the dust finally settled at the end of the game. Super Friends split up and took objectives winning them the game 28-12. My strategies weren't the best since I drank almost an entire 5th of Gin during this game, but the proof of concept for the Legion of Doom was at least a victory in my mind. The Legion killed a Libby, Wolfguard Battle Leader, Ravenwing Command Squad, and all of his Fenrisian Wolves. The Super Friends only managed to kill 6-7 Flesh Hounds from my Deathstar. I generated 8 Blood Tithe for a D-Thirster but unfortunately it was after my last turn. I had 3 units of jet bikes (Screamers) zooming around the board grabbing Maelstrom objectives. My failings were in protecting the Grimoire Herald and focusing on objectives. I can't wait for a rematch. Hopefully the practice will serve Bill well at Adepticon.

Wednesday, April 20, 2016

Adepticon and the 2016 Warhammer Championships


My first Adepticon is in the bag. It was a fantastic experience and I can't wait to do it again. Between the Lonely Havocs and the Gateway Gamers, our area group managed to take home a few awards and earn some top ranks.


Gateway Gamers team of Avery Windau, Jeff Berdar, Doug James, and Mike Horner took a 10th place finish overall in the Team Tournament as well as one of them winning a top player award in the Badab War Narrative Campaign. Congrats to the Gateway Gamers!


Our very own Squoze took home top honors for painting in the Necromunda event. Good job Squoze!

As for me and the 40k Championship, here's the recap:

My List:

Gladius Strike Force (Faction: White Scars)
Battle Demi-Company

HQ
Kor'sarro Khan - Moondrakkan
Elites
5x Space Marine Command Squad - Apothecary, Bikes, Grav-Guns
Razorback
Troops
5x Tactical Squad - Grav-Gun, Combi-Grav
Razorback
5x Tactical Squad - Grav-Gun, Combi-Grav
Razorback
5x Tactical Squad - Grav-Gun, Combi-Grav
Razorback
Fast Attack
3x Space Marine Bikes - 2x Grav-Guns
Heavy Support
5x Devastators - 2x Grav-Cannons and Grav-Amps
Rhino - Dozer Blade

Battle Demi-Company
HQ
Chaplain - Space Marine Bike, Hunters Eye
Elites
5x Space Marine Command Squad - 5x Melta-Guns
Drop Pod
Troops
5x Tactical Squad - Grav-Cannon and Grav-Amp
Rhino
5x Tactical Squad - Melta-Gun, Combi-Melta
Drop Pod
5x Tactical Squad - Melta-Gun, Combi-Melta
Drop Pod
Fast Attack
3x Space Marine Bikes - 2x Grav-Guns
Heavy Support
5x Devastators - 2x Grav-Cannons and Grav-Amps
Rhino - Dozer Blade

10th Company Task ForceTroops
5x Scouts - Sniper Rifle
5x Scouts

Game 1: Space Wolves (Kyle Chapin)


Deployment: Vanguard
Mission 1: King of the Hill (Cumulative Points by being within 12" of the center of the table)
Mission 2: Emperor's Will

Werewolves and dudes riding bears. Scary stuff. He won all the rolls, chose his side, and decided to deploy and go first. He was using the Deathpack formation from the new Start Collecting Space Wolves box. It basically allowed any unit within 12" of his Wolf Lord to run and charge. Which essentially set him up for a turn one charge with fleet. I deployed back to what I thought would put him just out of range. Turn one he dropped his pod right on my front line and blew up an empty Razorback giving him first blood. His 3 units of Thunder Bears all moved up along with the Landraider containing Wulfen. Unfortunately for me, he rolled really well for his run rolls and was in range for charges with his HQ unit and the Wulfen. As luck would have it, he failed both fleet charges needing something like 9" for both.


My two pods both came in and did work. My command squad with 5 meltas took out all but 1 of the Wulfen and my Tactical squad immobilized and stunned the Landraider taking it down to 2 hull points. My bike Command Squad charged his Grey Hunters killing all but one. Shots from Devastators, Razorbacks, and Bikes would kill one of his Thunder Bear squads. He had broken a Rune Priest off of his HQ unit to take out some Scouts I had infiltrated behind his army. He clearly didn't get the memo that Scouts are the shit. They would take him down in a hail of gunfire.

In his turn 2 he would fail a 4" fleet charge with his HQ unit and the last of the Wulfen died on overwatch. After that it was really just a clean up game for me. I ended up table him on turn 4 getting a full 30 points.

Game 2: Eldar


Deployment: Dawn of War
Mission 1: Divide to Conquer (Two 12" radius cumulative scoring areas. One for each player. Controlling or contesting the other players gives more points.)
Mission 2: Double Kill Points

My second opponent of the day brought something very similar to the list that won the Las Vegas Open in February. 45 Warp Spiders with scatter bike support. The one notable difference was the lack of a Wraithknight. I won the roll to choose sides and he won the roll to choose who deployed and went first. He chose to have me go first. I set up and he decided to null deploy. The game started and I moved half of my force onto his objective and half onto mine. During his first turn he dropped his pod onto my objective with a Tactical Squad and Librarian. Their shooting killed 1 bike. Turn 2 hit and I jumped up 5 points for being on both objectives. I wiped out the pod, Tactical Marines, and the Librarian netting me 6 more points. His turn 2, all except three of his Warp Spider squads came on. He managed to take out some bikes and some Razorbacks this turn. We would go on trading units back and forth heavily for the rest of the game.


Sadly for him, only a hand full of his units were objective secured while nearly all of mine were. I was smart enough to target those units first and wipe them off the board. This meant that I was usually scoring 6 points a turn on objectives alone since he couldn't contest them. While he got a ton of kill points I managed to do the same. In the end I also won this game with a perfect 30 points.

Game 3: Khorne Daemonkin (Kelsey Haley)


Deployment: Hammer and Anvil
Mission 1: Meat Grinder
Mission 2: Crusade

Let me just start by saying Kelsey Haley is an awesome guy. We started the game with him pouring us a couple shots of some pretty stellar scotch and it wasn't the last one we had. Kelsey was running 8 Maulerfiends and a Brass Scorpion in the Hellforged Hunting Pack formation. Good times. I felt like I had met Kelsey before. It wasn't until the end of the game when I realized that I've watched Kelsey in a few battle reports on the Long War Youtube channel.

Kelsey won the roll to choose sides and to deploy/go first. In his first turn he moved everything forward. Shots from the Brass Scorpion took out a unit of bikes. My turn one, the 5 melta gun Command Squad and a melta/combi melta Tactical Squad came in near the Brass Scorpion. I basically fired everything I could into the Brass Scorpion this round and blew it up. It had to happen asap or it was gonna mulch me.


In his turn 2 he assaulted with all of his Maulerfiends. One of them blew up to a lucky melta gun overwatch. I think another would get immobilized by a grav-gun on the charge. Lucky stuff for me. The others all made their targets. If I recall correctly, he destroyed a Rhino, Razorback, a unit of Scouts, and Tactical Squad. One tactical squad survived an assault and hit and ran out. In my turn I either immobilized or blew up all but 2 of his Maulerfiends. Knowing that he couldn't pull out a win with only 2, he conceded the game. Another perfect score of 30.

At this point I'm thinking, "Holy shit! I may actually make top 16 at my first Adepticon."

Game 4: Chaos Daemons (Nick Nanavati)


Deployment: Dawn of War
Mission 1: Cumulative Objectives (Each objective was worth 2 points if you were on it at the start of your turn, starting round 2.)
Mission 2: Crusade

Nick was running a Daemons CAD and the Burning Skyhost from the War Zone Fenris book. It consisted of 9 units of Screamers and 1 Herald on a Disc. From what I can remember, his CAD had Fateweaver, Nurglings, and 2 Heralds on Discs. I'm fairly certain there were a couple other units as well but at the moment I can't recall. He also had an Imperial Bunker with a Comms Relay. His Screamer star was pretty standard. Grimoire, Invis, unkillable, etc. I won the roll to choose sides and Nick won the roll to deploy first and choose who went first. We both placed objectives in a small triangle in the opposite corners of our deployment zones. He castled up in the corner with all of his objectives. He surround his Heralds to ensure I wouldn't be able to kill any. I deployed half of my army on my objectives and the other half directly across from him. I reserved all of my bikes including my command squad. I chose not to scout because I felt that it would just be feeding him units. Screamers poo on light transports in assault. He ended up giving me first turn and the game started.

It was night fight so he was jinking for 3+'s re-rolling 1's which is tough to kill, especially on 2 wound models. I would have had to eat through 8 Screamers before getting to the Heralds. I decided that I would just ignore that unit and make an attempt at killing Fateweaver. Both pods came in contesting 2 of his objectives. I poured every shot I could get in to Fateweaver. Sadly, I couldn't finish him off and left him alive with 2 wounds. I also killed 1 Screamer and 2 Nurglings. Having brought a ton of Grav weaponry to counter Eldar, really backfired on me in this round. They only wounded on 6's since daemons have no armor saves. Sad times. In his turn one he took half of the Screamers and lined them up down the entire left side of the board. If my outflank reserves came in on that side they would die immediately from the inability to come on 1" away from any of his models. I definitely didn't see that one coming. It was a fantastic play. Fateweaver flew forward killing a marine with vector strike. His Screamer star powered up and became unkillable. He used it to multi-assault a drop pod and a unit of Tactical Marines killing both.

At the start of turn two I grabbed 6 points for holding 3 objectives. I attempted to drop another pod on one of his objectives but scattered off. The 2 units of the bikes came in. One would die to his screamer wall and the other came in on the opposite edge. Shooting would see me drop another wound from Fateweaver and kill a couple Screamers. Fateweaver attempted to kill some Rhinos with psyker powers and failed. His turn 2 he grabbed 2 points for objectives. He attempted to deep strike in a unit of Nurglings, misshaped, rolled a 1, and lost them to the warp. He attempted to bring in the second unit in the same place and misshaped again. This time I got to place them and I put them in his back corner where he deployed. He assaulted and killed both pods as well as a unit of Tactical Marines.

Turn 3 I grabbed another 6 points. My Bike Command Squad and HQ's came in on my side of the board avoiding the Screamer wall. I killed a few screamers and tried to kill Fatewaver but the slippery bastard refused to die. He grabbed 6 points for objectives at the start of his turn. Fateweaver flew off the board. The Screamer star summoned more Screamers. Now that all of my units were on the board the Screamer wall decided to join the game. The screamers all made a bum rush towards my transports. He managed to surround 2 in assaults this turn killing them and the guys inside since they couldn't disembark while the vehicle was surrounded.

The next two turns were pretty much the exact same thing. I new after turn 3 that my only chance of winning was for the game to end on turn 5. At that point I held 2 objectives and he held 4. Had the game ended It would have been almost a tie. Sadly, it didn't go down that way. Turn 6 happened and it was the nail in the coffin. Screamers finally munched up all of the units I had on any objectives. Crusade objectives were worth 5 points at the end of the game and having all six shot him up 30 points. In the end I got 0 points and he got the perfect 30.


I finished 28th/190ish players which put me in the top 15%. Not bad for one of the biggest grand tournaments in the country and my first large scale event. The only thing that stopped me from making it to the top was getting paired with Nick for my 4th and final game of the day. Nick Nanavati has won Adepticon 3 years and been in the top 10 for the past 6. He was an incredibly difficult opponent and great to play against. It was a great game. I'll chalk that up as a win in my book.

Saturday, April 2, 2016

Fun times at ADEPTICON 2016!!

So we just got back from Adepticon, wanted to stay the whole weekend but someone decided to put STL Comicon on the same weekend and we needed to get back to nerd out even more (got a photo op with Billie Piper tomorrow, Matt Smith today, I'm stoked!)  Anywhooo, took just a few photos of the past two days.  We had a ton of fun, made some new friends and played some awesome games!

Tuesday, March 29, 2016

Hobby Update: Adepticon Space Marines are Ready to Roll


Thank the maker I'm finally done painting this army! I knew in January when I decided that I was going to build and paint an entire Space Marine Battle Company for Adepticon, that it would be pretty tough to pull off. Hell, I even added in the extra task of creating a display board. Even though I died a little inside from the incessant grind of batch painting, I think I still managed to achieve a quality product that should score well in the painting category. I know that those extra points can be a huge boost to your score. It was my painting score at DieCon this year that pushed me to 2nd place overall. Hopefully, it will be just as helpful for me at Adepticon.


Sunday, March 27, 2016

Hobby Update: Adepticon Tau Army Complete

With a few days to spare I am glad to say I have finished painting up my Tau army for Adepticon. I have made a small change to the list and dropped the firewarriors and added two Crisis Suits with twin linked Fusions. Since my last post, I had to paint two Stromsurges and the two above mentioned Crisis Suits. Lets take a look at the army!


Now for a closer look at the newly painted items:


Hopefully this army can pull out all the stops and wreck some face this week in the championships. Wish me luck!

Wednesday, March 2, 2016

Hobby Update: Riptides Done

Finished up work on the three Riptides for my Adepticon list today. Two days behind schedule. Next up is the Stormsurges.


Also made a change to the army. By playing with the upgrades on the single Iontide, I was able to free up enough points to add an Ordo Xenos Inquisitor with three Servo Skulls (which I already have painted from previous efforts). In my test games with Adam (with him playing his White Scars Battle Company that you can see progressing along on this blog) I have many times come very close to winning to only lose by a landslide. Preventing his scout move will hopefully give me time to get into position to score more points and help me to have a better alpha strike vs his force while mitigating the damage I take in his first turn. Optimizing my list to play vs his is a very big factor as the Adepticon mission packet heavily favors his list (not just vs my list but in general) and I see his list being one of the most powerful armies that can be fielded in the format.

Only two models left to paint!

Monday, February 29, 2016

Hobby Update: Scouts/Display Board


Scouts are done. They went way easier than I expected. I also finished up my display board. It's all starting to come together. Now I just need to paint up 45 Space Marines by March 30th and I'll be good to go for Adepticon. I only hope they go as smoothly and quickly as the Scouts did.


Friday, February 19, 2016

Emperor's Children Rhinos/Razorbacks


Things are progressing smoothly on the Adepticon painting front. I just put the last bit of work into the Rhinos/Razorbacks. These bad boys turned out fantastic. They don't have the sponge work/weathering that my drop pods have but I chalk that up to the drop pods having to do an orbital insertion.


Two of the Razorback turrets are magnetized to run either lascannons or assault cannons.


And two of the Razorbacks can also be run as Rhinos. I totally forgot to add the stormbolters to the Rhinos in the back of this picture. Rest assured they do exist and magnetize next to the hatch just like the Rhino in the middle front. From here I move on to the 11 Scouts.

Thursday, February 18, 2016

Hobby Update: Display Board

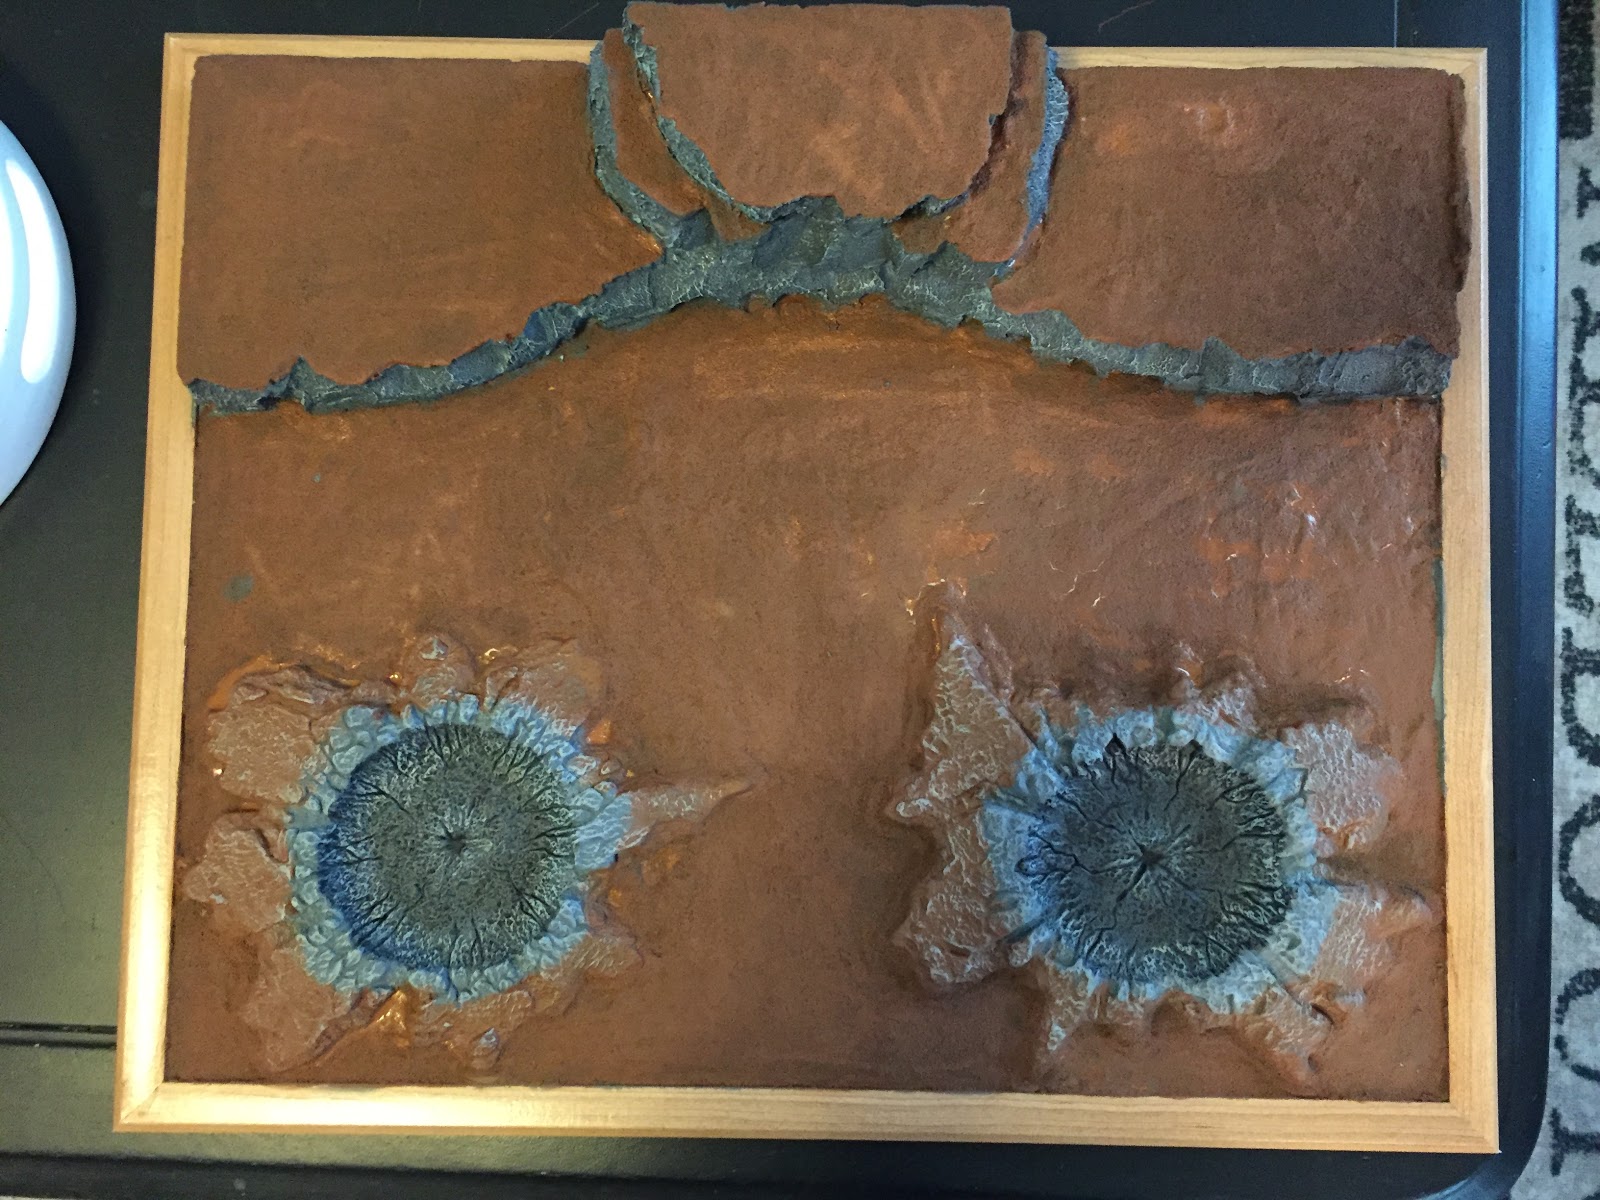
Took a break from painting Riptides and banged out my display board for adepticon.  Started with a basic design of two craters and a paper out line of some hills.  Fellow Havoc Adam (capnmoe) had some extra foam and we did a foam for some craters trade.  Here is what the planning stage of the board looked like:


Next up the hills, craters, and sand are are all glued to the board.  The hills have some toothpicks inside as well to add stability.  Here is how it looks at this point:


Everything is the primed grey. The primer did worry me a bit as the spray caused some very minor melting of the foam. This turned out to be a non issue as base coats covered the damage. The sides of the hills and the insides of the craters are coated grey while the sand is all coated brown. Here is the result of this step:


I wanted to bring level of detail into the craters. I washed the inner parts with a black wash and the did a small highlight around the center point making sure to leave a black point in the middle. Then I highlighted the inner rim with two levels of brighter grey and then highlighted the outer non washed parts. I also highlighted the brown parts of the outer crater with grey then a light brown to help link the colors to each other.  I am happy with how it turned out:


The final step was to highlight the brown sand and get some flock onto the board. Here is the final look both by itself and with the army on it:


Next week back to finishing the Riptides!!!